Owner’s Manual and Operation Guide for Technomad Military Turnkey Systems
CONTENTS
Introduction
Systems
- System Setup
- System Operation
Loudspeakers
- Deployment
- Polyethylene cabinets
- Wiring
- Cabinet maintenance
- Troubleshooting
General Info
Introduction
Thank you for purchasing a Technomad turnkey military PA system. Our systems provide high quality sound reinforcement in even the toughest conditions. To ensure optimum performance, be sure you understand all aspects of system installation and operation before use.
System Overview
There are several configurations of Technomad MilPA turnkey systems available. Each turnkey system is based on Technomad’s high quality, weatherproof loudspeakers. All systems include speaker cables and a pre-wired Control Rack which contains an amplifier, mixer, CD player and microphone. All systems feature additional mixer input channels allowing you to expand your system by plugging in additional microphones, MP3 players, etc…
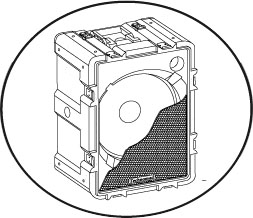
Technomad loudspeakers deliver unparallel full-range audio in a tough, Military specification package. With features like the WeatherTech grill system, self-draining polyethylene cabinets, and stainless steel hardware, Technomad loudspeakers provide years of operation indoors or out when properly installed. Technomad’s weatherproofing design does not compromise the sound quality of our loudspeakers- in fact Technomad loudspeakers offer a level of performance equal to that of the finest indoor-use concert systems.
All components of our turnkey system have been chosen for their quality and system compatibility.
Unpacking
All Technomad systems are shipped tested and fully operational. When you first receive the shipment, you should inspect each package for any sign of damage. In the event that there is any damage, please notify the carrier immediately to file a claim. While we will help in any way possible, it is the responsibility of the receiving party to file the shipping claim. If any parts are missing from the shipment, contact Technomad at: 617.275.8898 x 710 (international 617.275.8898 x 710) or email [email protected] and we will help you locate the missing products.
If any products need to be returned to Technomad for repair, contact Technomad for RMA number. Items returned without RMA # will be refused.
MilPA System Setup & Operation
- After moving the rack case to the desired location, remove the front and rear lids. Plug the power cord from the power strip into a clean source of 110V grounded AC power. The rack is weather-resistant when in transport mode, but the amplifier and mixer should be protected from water or rain when operating. Be sure that the Control Rack is in a sheltered location when deployed.
- Put the loudspeakers in the desired locations and plug them in using the provided speaker cabling. Any of the connectors on the loudspeaker can be used. The cable connector should be fully inserted into the loudspeaker connector and then turned clock-wise. You will feel the connector click into the proper position when properly seated. To verify proper contact, gently pull on the cable connector- it should not come out of the loudspeaker.
Plugging two cables from the amplifier into the same speaker will cause damage to the system and is not covered by the warranty. The only time more than one cable should be plugged into a loudspeaker is if the second cable is going to another loudspeaker which is not connected to the amplifier in any way.
- If you plan to use an additional audio line source such as a CD player, musical instrument or hard disk playback device, connect the output of the source to one of the unused RCA inputs on the rear of the mixer. Turnkey Military PA Systems come with a CD player which is pre-connected to the first two line input pairs.
- Turn the two volume control knobs on the front of the amplifier all the way down counter-clockwise. Turn the Master control on the mixer all the way down counter-clockwise to ‘0’. Turn on the mixer and any other equipment (CD player, etc…) and then turn on the amplifier. The amplifier should be always turned on last.
Turnkey PA System Setup & Operation
- Turn the control knobs on the amplifier up all the way.
- Turn the Master control knob on the mixer up halfway (to the ‘12 noon’ position) – make SURE that the various input controls for the mic, CD, etc. are turned all the way down before you do this!
- Now it is time to set the levels of the inputs to the mixer. Turn up the mixer control knob of the source you want to hear slowly. Do not turn any control knob on the mixer up past the 2 o’clock position. If you are using more than one source, for example both a CD player and microphone, adjust the controls for the respective inputs to get the mix you want. When speaking into the mic., do not point the microphone towards the speakers to prevent feedback. Any line source (CD, etc…) should be playing when you set the level for that input.
- Confirm you can clearly hear the sources through the loudspeakers and adjust the mix to your liking.
- To adjust the volume of the system, turn the master control up or down. When turning up the Master control, watch the ‘Clip’ light on the front of the amplifier. If this light goes on, turn down the Master control until the light is off. The amplifiers used in our turnkey systems have built-in protection against clipping and if the amp input is overdriven, the amp will shut itself off for 5 seconds.
- When shutting down the system, first turn down the master control of the mixer all the way down and then shut off the amplifier. After the amplifier is off, the rest of the equipment can be shut down. It is important to shut the amplifier off first as otherwise the ‘pop’ of the other gear switching off can damage the speakers.
The best indicator that the system is being improperly operated is distortion. Listen to the system! A common cause of distortion is having the amplifier gain controls turned down and having the mixer master volume control turned up too far to compensate. Always operate the amplifier at or near maximum output and control the system volume with the mixer master control. If the speakers do sound distorted, you should turn down the system and investigate what is causing the distortion. It is possible to damage the speakers even while operating them at less than the rated power if they are not given clean signal from the amplifier.
System Expansion Any MilPA system can be expanded by adding one or more “Expansion Kits” – Expansion Kits add two Pismo or Omaha loudspeakers and cables. You should never operate more than three loudspeakers off of any one loudspeaker channel, and the maximum number of loudspeakers which can operate off of one Control Rack is six. The MilPA1 and MilPA3 systems can be expanded using the “Pismo Expansion Kit” and the MilPA2 and MilPA4 can be expanded using the “Omaha Expansion Kit”.
DEPLOYMENT
Stand Mounting All Technomad loudspeakers feature four 1.5” diameter stand mounting sockets – one per side – molded directly into the cabinet wall. Technomad’s stand mounting sockets are flush with the surface of the loudspeaker cabinet to allow for quick and easy set-up, break-down, and storage. When tripod mounting loudspeakers, be sure that they are stable and secured from falling over. Failure to follow these precautions may result in damage to the equipment, personal injury or death.
Flying WARNING: Suspending any object is a potentially dangerous and should only be attempted by qualified individuals. The user assumes all liabilities for proper design, installation and use of rigging systems. Failure to undertake proper design and installation of a rigging system may result in damage to equipment, personal injury or death.
Do not suspend the loudspeaker from fewer than four suspension points. Do not hang the loudspeaker from the handle. Always provide an independent safety cable to the cabinet in case of failure of the primary support. Follow good rigging practices and local codes.
Technomad loudspeakers are equipped with molded in flying points. Pismo loudspeakers are equipped with 4x 1/4-20 threaded inserts on the top and side. Omaha loudspeakers all feature 4x 3/8-16 threaded inserts on all sides. All flypoints are rated at 10:1. All flypoints allow the loudspeaker to be used in either the horizontal or vertical orientation. Only rated forged eyebolts should be used to hang a loudspeaker.
Bracket Mounting All Technomad loudspeakers can be bracket mounted using the four threaded inserts molded into the rear of the loudspeaker. When mounting the brackets to the loudspeaker be sure that all four bolts are fully and properly threaded. Model: Ohama = Bolt size: 3/8-16 x 1” Model: Pismo = Bolt Size: 5/16-18 x 1”
Loudspeaker Orientation: loudspeakers should be installed in the vertical orientation – with the loudspeaker grill in the vertical orientation. Alternatively, the loudspeaker may be installed in a tipped–forward orientation – with the loudspeaker grill rotated forward towards the earth. The loudspeaker must not be installed tipped-backward (with the grill tipped backwards towards the ceiling or sky). Failure to install correctly can result in loudspeaker damage which would not be covered by factory warranty.
POLYETHYLENE CABINETS Technomad: Not Just another Plastic Loudspeaker
Several important factors in the Technomad design and manufacturing process distinguish Technomad from the growing field of ordinary plastic loudspeakers.
Design Technomad loudspeakers deliver higher performance and output than any other plastic loudspeakers. Technomad loudspeakers provide a wider range of features making Technomad loudspeakers the only choice for year-round, indoor, outdoor, permanent, semi-permanent or mobile applications. No other plastic loudspeaker can match Technomad in application, flexibility, fidelity durability, options, price and performance.
Manufacturing Technomad enclosures are manufactured of military grade polyethylene and molded as an extremely rugged one piece unit. Our manufacturing process produces an incredibly thick .5” with .75” thick corner areas. The cabinet walls of most plastic loudspeakers are 25% to as much as 65% thinner than the cabinet walls of a Technomad loudspeaker. A Technomad loudspeaker cabinet is able to endure greater abuse than any other commercially available loudspeaker – regardless of construction materials and manufacturing methods. Also, a thicker cabinet wall has better acoustic properties than a thinner loudspeaker cabinet wall. The thicker cabinet wall reduces distortion and/or inefficiency problems due to wall flex. Technomad loudspeakers produce a full, articulate sound, comparable to the performance of a well braced, multi-ply Baltic birch cabinet.
Compliances/Specifications Met Technomad self-casing loudspeakers are designed to meet and exceed ATA-III, and fully comply with United States Military Specification 810F. No other commercially available plastic or wood loudspeaker can make that claim.
Technomad polyethylene cabinets have many advantages over traditional wooden cabinets. Unlike wood, high quality recycled polyethylene is a renewable resource. Polyethylene is impervious to moisture, virtually all solvents, mold, mildew, and UV radiation. There is no waste in the Technomad cabinet manufacturing process. Because they are cast as one solid piece through a low stress manufacturing process, Technomad cabinets are extremely strong and do not splinter or crack when subjected to abuse.
WIRING Technomad loudspeakers feature locking, weather-resistant Neutrik Speak-On™ connectors. Neutrik jacks work with 2 and 4 conductor wires. The Neutrik jacks have four internal connection points. One pair is marked “1” and the second pair is marked “2”. When buying or making Neutrik-terminated cables to interface with Technomad speakers, it is important to observe the following:
- Neutrik NL4FC model cable connectors or compatible connectors must be used with Technomad loudspeakers.
- Technomad loudspeakers are wired to the 1+ and 1- terminals in a Neutrik connector. Do not use the terminals labeled 2+ or 2-. This information is only needed if you are repairing or wiring your own cables. Cables purchased from Technomad will work ‘out of the box’.
Caution should be used when daisy-chaining multiple loudspeakers from a single amplifier. If a cable is over 20’ long, 12 gauge wires is highly recommend preventing signal degradation. The maximum number of loudspeakers that can be daisy chained from one amplifier output is three. A total of six loudspeakers can be operated from one amplifier, by using the left and the right amplifier outputs.
CABINET MAINTENANCE
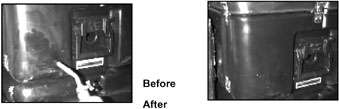
Maintenance of Speaker Body The Technomad polyethylene loudspeaker cabinet is a manufacturing breakthrough. The one-piece Technomad speaker cabinet provides a very rugged, watertight and scratch-resistant enclosure for transporting the high-quality sound reproduction electronics. Your Technomad speaker will need very little maintenance. If, after some time, you want to eliminate scratches that develop, follow these simple instructions:
Technomad Cabinet Refurbishment:
- Thoroughly clean the surface of the speaker using warm water, a soft brush, and mild non-detergent soap.
- Dry the loudspeaker.
- Using a propane blowtorch, slowly fan the flame over the scratches you need to repair. In a few seconds you will see the scratches disappear and the surface will become shiny as a thin film of plastic liquefies. Deep scratches may take longer to erase. IT IS POSSIBLE TO CHAR THE SPEAKER if the flame is kept on one area for too long. Constantly keep the flame in motion. Keep the flame away from the loudspeaker cones, compression drivers, foam grill covering, Neutrik jacks and other hardware.
- Allow the surface to completely cool for 15 or more minutes or until the treated area is cool and hard to the touch.
- Buff the surface with a 3M™ Scotch-Brite pad, fine steel wool or other mild abrasive. This will bring the treated surface area back to the original factory finish.
TROUBLE SHOOTING
No sound from speaker A) Make sure that the cabling you are using is wired correctly. The signal for the full range units must be wired to the “1” pair of contacts on the cable-mounted Neutrik Speak-On™.Be certain that the Speak-On connector is both fully inserted into the speaker connector, but also turned to the locked position (See above, MilPA System Setup & Operation for details.) B) Technomad loudspeakers are equipped with fuses for component protection. Check the fuses to ensure that they are still intact. The fuse holders are located on the bottom of the loudspeaker in the handle well on the loudspeakers. See the separate fuse sheet included with this manual for proper fuse values.
Buzzing or humming sound from speakers Check all cables to ensure that they are properly inserted into the appropriate connectors. Be sure that all powered equipment, i.e. the amplifier; mixer, etc… are plugged into a source of clean, stable AC power.
Mixer channel not working Check all cables to ensure that they are all fully inserted into the inputs on the back of the mixer and the outputs of the line source which isn’t working. These connections can work loose during shipping if exposed to heavy vibration.
System cuts out while operating The amplifier has built in protection against having the inputs overdriven. If the output signal from the mixer is too high, the amplifier will detect this and shut itself off to prevent damage from occurring. If this happens, turn down the mixer ‘Master’ control knob down all the way and press the reset button on the amplifier. Once the amplifier has restarted, you can then turn up the Master control knob on the mixer. If the ‘clip’ light on the front face of the amplifier goes on, you have turned up the output control too far and should turn the Master control down until the clip light stays off.
TECHNICAL SUPPORT
For tech support, call your dealer, call 800.464.7757x 4 (international 617.275.8898 x 710), or send e-mail to [email protected].
Technomad’s military-specific website is: https://bigislanddev.lm.solar. Here you can download a full line catalog, review accessories, read application articles, read Frequently Asked Questions, and more.